

📦 What’s in the box:
When you open your Audio Visualizer AR-384X, you’ll find everything you need to get started right away:
Audio Visualizer AR-384X Unit – 384-LED display with integrated controls.
Power Cable – USB-C to USB-A, plug & play.
2 Metal Rods – Attach easily to the unit, serving as a sturdy vinyl artwork holder.
Audio Splitter (Y-Cable) – Optional accessory included if you want to connect an audio source directly and bypass the microphone.
3.5 mm Jack Line Extension (5 ft) – Connects from the Y-splitter to your unit for flexible placement. Also included.
⚠️ Important / Required
Please read carefully before using your Audio Visualizer AR-384X. Following these requirements will ensure the best performance and keep your unit safe.
Your Audio Visualizer AR-384X drives 384 ultra-bright LEDs and internal electronics that require stable power.
Use an USB power adapter rated at least 5V / 2A.
Using a weaker source may cause the unit shutting off unexpectedly, flickering or dim output.
While it may be tempting, do not power your unit from a computer USB port.
Computer USB outputs often carry electrical noise that can cause instability in the LED display and degrade audio visualization quality.
For best results, use a clean, dedicated USB wall adapter or powered USB hub.
The Audio Visualizer AR-384X is a handcrafted unit with a precision LED screen and acrylic glass.
The screen surface is fragile and can be scratched or damaged if mishandled.
Avoid drops, strong pressure, or stacking heavy objects on top.
Always place the unit on a stable surface and handle gently when inserting/removing the vinyl stand rods.
⚙️ Using the Menu
Your Audio Visualizer AR-384X is controlled with three knobs:
Modes | Menu: Change visual modes or press to access the menu.
Amplitude: Adjust responsiveness when using the built-in mic (not active when aux cable is plugged in).
Colors: Instantly change spectrum colors. At the end of the cycle, select Random Mode to have colors change automatically every minute.
Accessing the Menu
Press the left knob (Modes | Menu) once.
The menu appears on the LED display.
Navigating the Menu
Rotate the knob to scroll through menu options.
Press the knob to select an option.
Rotate again to adjust values.
Press once more to confirm.
Setting the Clock
Press the left knob (Modes | Menu) to enter the menu.
Rotate the knob until you see SET CLOCK.
Press the knob to enter clock settings.
Adjusting the Time
Rotate the knob to adjust the hours.
Press once to confirm and switch to minutes.
Rotate again to adjust the minutes.
Press once more to confirm.
Exiting & Saving
Long-press the knob (2 seconds) to exit and save, or
Wait for the menu to auto-save after inactivity.
The clock is saved automatically and will remain set even after powering off the device.
Scroll Message Edit (Special Behavior)
Enter the menu and rotate until you see “EDIT”.
Press to enter Edit Mode.
Cursor Position Mode
Rotate the knob to move the cursor to a character.
Press the knob to enter Character Edit.
Character Edit Mode
Rotate to select a character.
Press once to confirm.
Double press quickly = delete character (backspace).
Long press (2 seconds) = return to Cursor Position Mode.
Exiting Edit Mode
From Cursor Position Mode: long press (2 seconds) to return to the menu cycle.
Adjusting Amplitude
The middle knob (Amplitude) works only with the built-in mic.
If you are using the 3.5 mm aux input, amplitude is controlled through the menu option “AUX IN GAIN LEVEL.”
Exiting & Saving the Menu
After 60 seconds of inactivity, the menu closes and saves changes automatically.
You can also long-press (2 seconds) the left knob to exit immediately.
Reset to Factory Defaults
At any time, you can perform a factory reset:
Press and hold the left knob (Modes | Menu) for 10 seconds.
The screen will ask you to confirm.
Press the knob once to confirm.
The device will restart with all settings restored to default.
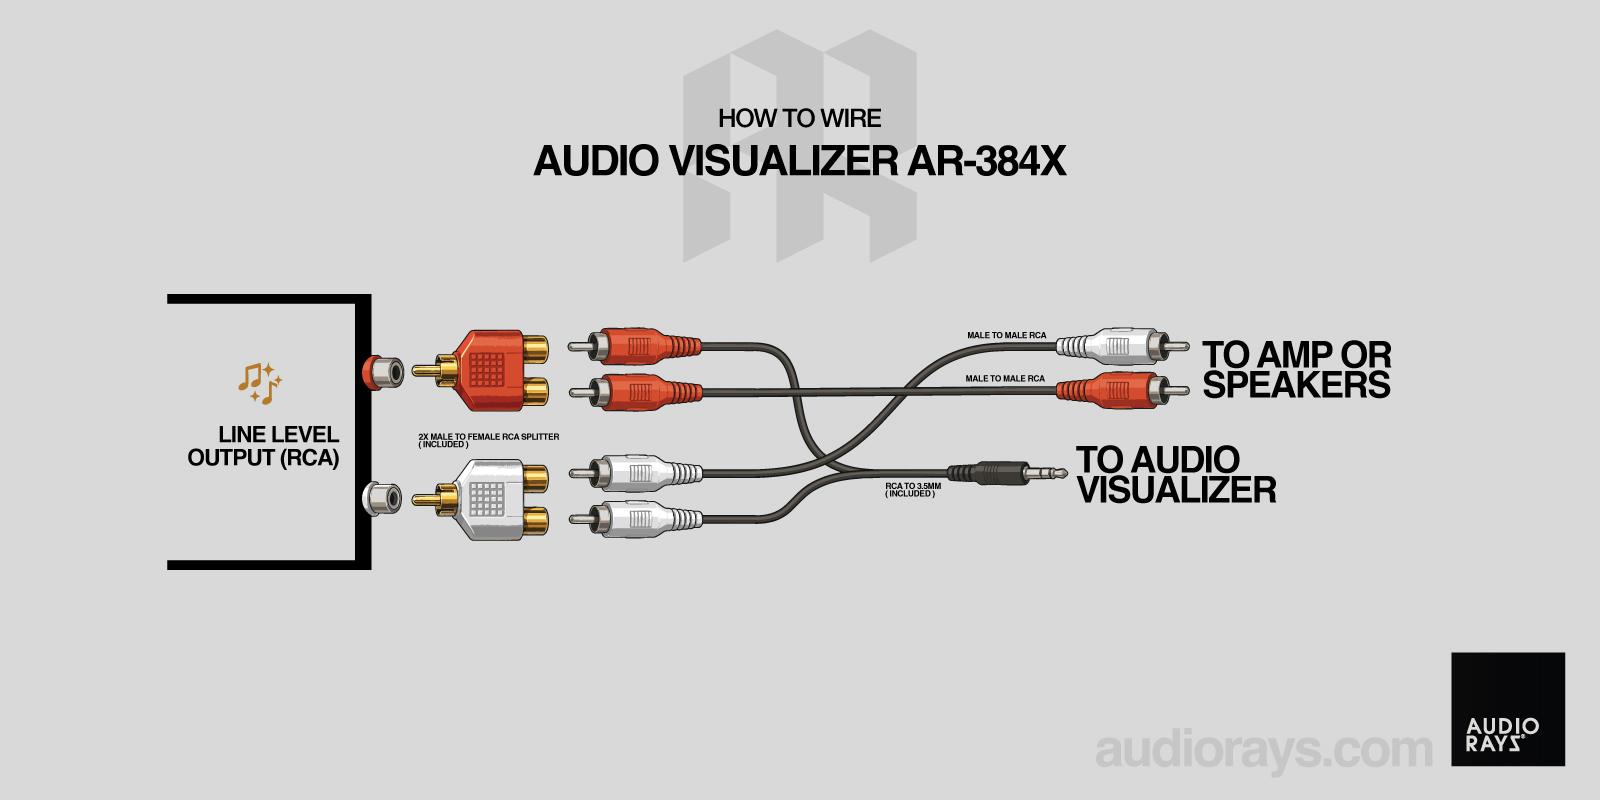
🔧 Wiring the Audio Visualizer
The line-in method is far more accurate than the built-in microphone for multiple reasons. It delivers a clean, direct audio signal, avoids background noise and room acoustics, and ensures the visualizer reacts only to your music or audio source, not to ambient sounds.
This results in more precise, stable, and reliable visualizations.
To wire your amp, receiver or turntable with the Audio Visualizer AR-384X, you’ll need:
2 × MALE TO FEMALE RCA Splitters – Included
1 × RCA to 3.5mm cable – Included
The splitters allow your audio source to feed both your amplifier (or powered speakers) and the visualizer at the same time.
Your speakers continue playing normally, while the Audio Visualizer receives the same line-level signal to react in real time.
If the visualizer does not react (but the built-in microphone works), try the following checks:
Test the audio output
Unplug the visualizer and connect headphones or a speaker to the same RCA output.If you hear music, the audio signal is present and should work with the visualizer.
If you don’t hear anything, the issue is likely with the source or the wiring.
Increase the output level
The visualizer requires a sufficiently strong audio signal to react.
Gradually raise the volume or output gain from your amp, mixer, or sound system.
If the steps above don’t resolve the issue, feel free to contact our support and we’ll help you get everything running smoothly.
🔧 Update your firmware
From time to time, we release firmware updates to improve performance, add new features, and fix bugs. Keeping your visualizer up to date ensures you get the best possible experience.
The most recent firmware version is:
Latest Version: 1.16
Release Date: 06-11-2026
To check which version is currently installed on your device:
Push the left knob once
Rotate the knob to the left (counter-clockwise)
Your current firmware version will appear on the screen
- Press the left knob 3 seconds to exit the menu
If your version is older than 1.16 , we recommend updating your device by clicking the buttton below.
🔧 Troubleshooting
Unit doesn’t power on
Check that your USB adapter provides at least 5V / 2A.
Try a different USB cable or wall adapter.
Avoid using a computer USB port — it may not provide stable power.
LEDs flicker, dim, or shut off
This usually means the power source is too weak. Use a 5V / 2A adapter for best results.
Confirm the USB cable is fully inserted and not damaged.
No sound detected with built-in microphone
Make sure the unit is not blocked or enclosed.
Increase the amplitude knob to boost sensitivity.
Check if you’re using the aux input — if so, the mic is bypassed.
No response with aux input
- Make sure the audio source volume level is high.
- Ensure the Y-splitter and 3.5 mm extension cable are connected properly.
Verify your audio source is active and outputting signal.
Increase the aux gain in the menu if the signal is weak.
Hum, buzz, or ground noise when using RCA / AUX (Earth Hum)
- A low hum or buzzing noise can occur when the visualizer is connected via RCA or AUX due to a ground loop between devices.
- Ensure the Y-splitter and 3.5 mm extension cable are connected properly.
- This is common with turntables, amplifiers, powered speakers, or audio equipment connected to different power sources.
- Depending on your setup, using a Ground Loop Noise Isolator (3.5 mm audio type) can resolve the issue.
A product like a Ground Loop Noise Isolator for Audio/Home Stereo Systems (3.5 mm) often fixes this immediately, like this one: https://a.co/d/5m6Y3hx
There are also many helpful YouTube videos explaining what ground loop (earth hum) noise is and how to eliminate it, if you’d like to better understand the cause.